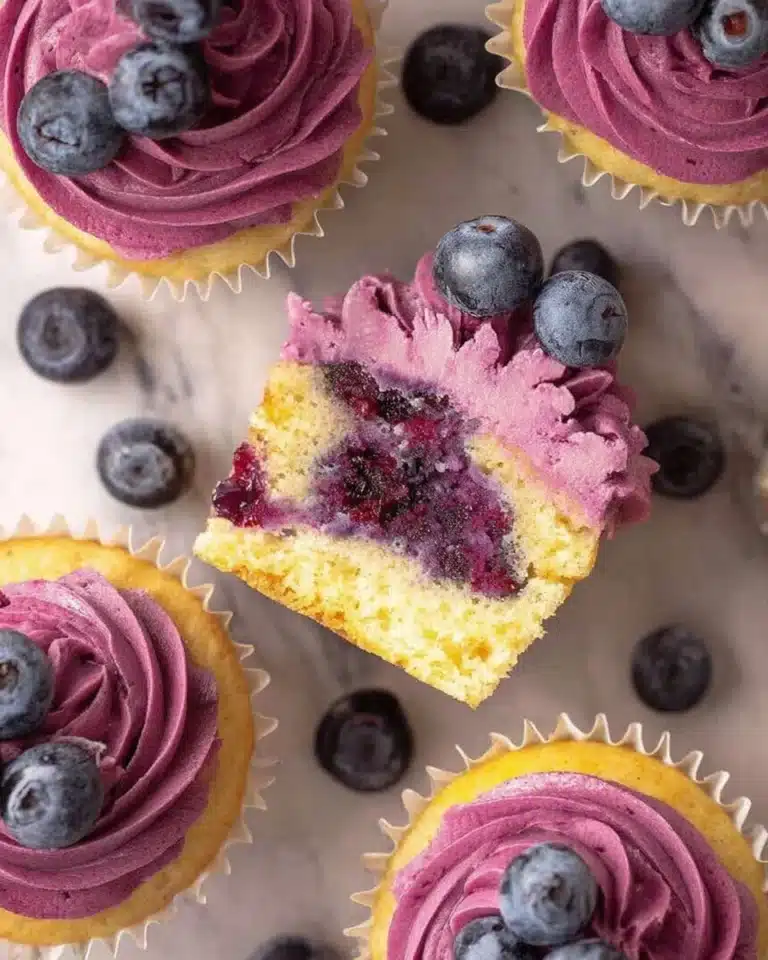
Spring Vanilla Cupcakes Recipe

This post may contain affiliate links
Spring Vanilla Cupcakes are incredibly versatile, making them perfect for any occasion, from birthday parties to casual picnics. Their light, airy texture melts in your mouth, while the rich vanilla flavor dances on your palate. With just a few simple ingredients, you can create a delightful treat that will impress your family and friends. So, let’s roll up our sleeves and dive into the world of Spring Vanilla Cupcakes, where every bite is a taste of springtime bliss!
What is Spring Vanilla Cupcakes?
Spring Vanilla Cupcakes are a delightful dessert that captures the essence of the season with their light, fluffy texture and sweet vanilla flavor. Originating from the classic American baking tradition, these cupcakes are a staple in many households, especially during springtime celebrations. The simplicity of the recipe allows for a variety of adaptations, making them a beloved treat across cultures.
These cupcakes reflect a global influence, as vanilla is one of the most popular flavors worldwide. The use of fresh, quality ingredients elevates the taste, creating a dessert that feels both comforting and celebratory. Whether you’re enjoying them at a family gathering or a picnic in the park, Spring Vanilla Cupcakes bring a sense of joy and warmth to any occasion.
Why You’ll Love This Spring Vanilla Cupcakes
- Perfectly fluffy texture that melts in your mouth.
- Easy to make, ideal for both novice and experienced bakers.
- Versatile for any spring celebration or gathering.
- A delightful treat that appeals to all ages.
Who It’s For
These cupcakes are perfect for busy families looking for a quick and delicious dessert option. They cater to health-conscious cooks who appreciate simple, wholesome ingredients. Food lovers will also enjoy the versatility of Spring Vanilla Cupcakes, as they can be customized with various toppings and flavors to suit any palate.
When to Cook It
Spring Vanilla Cupcakes are ideal for a variety of occasions, including spring celebrations, birthdays, family gatherings, or casual get-togethers. Their cheerful appearance and delightful taste make them a go-to dessert for any festive moment, bringing smiles to faces young and old alike.
- 1 ½ cups all-purpose flour: This is the base of your cupcakes, providing structure and texture. You can substitute with gluten-free flour for a gluten-free version.
- 1 cup granulated sugar: Adds sweetness and helps create a tender crumb. For a healthier option, consider using coconut sugar.
- ½ cup unsalted butter, softened: This gives richness and moisture. If you’re dairy-free, you can use coconut oil or a plant-based butter.
- 2 large eggs: They bind the ingredients together and add moisture. For an egg-free version, try using unsweetened applesauce (1/4 cup per egg).
- 1 cup milk: This adds moisture and helps create a light texture. You can use almond milk or oat milk as a dairy-free alternative.
- 2 teaspoons vanilla extract: This is the star flavor of your cupcakes. For a more intense vanilla flavor, consider using vanilla bean paste.
- 1 ½ teaspoons baking powder: This leavening agent helps the cupcakes rise and become fluffy. Make sure it’s fresh for the best results.
- ½ teaspoon salt: Enhances the flavors and balances the sweetness.
- Preheat your oven: Set it to 350°F (175°C) and line a cupcake pan with liners. The anticipation of baking fills the air!
- Cream the butter and sugar: In a large bowl, beat together the softened butter and granulated sugar until the mixture is light and fluffy. This step is crucial for a tender cupcake.
- Add the eggs: Incorporate the eggs one at a time, mixing well after each addition. You’ll notice the batter becoming richer and creamier.
- Stir in the vanilla: Add the vanilla extract, and let its sweet aroma envelop your kitchen.
- Mix the dry ingredients: In another bowl, whisk together the flour, baking powder, and salt. This ensures even distribution of the leavening agent.
- Combine wet and dry: Gradually add the dry ingredients to the wet mixture, alternating with the milk. Mix until just combined; overmixing can lead to dense cupcakes.
- Fill the liners: Spoon the batter into the cupcake liners, filling them about 2/3 full. This allows room for rising without overflowing.
- Bake: Place the pan in the oven and bake for 18-20 minutes. Check for doneness by inserting a toothpick into the center; it should come out clean.
- Cool: Allow the cupcakes to cool completely in the pan before transferring them to a wire rack. This step is essential for perfect frosting application.
If you’re looking for sugar alternatives, consider using stevia, monk fruit, or allulose as substitutes for granulated sugar. These options provide sweetness without the same impact on blood sugar levels. However, avoid using honey or maple syrup, as they can still raise blood sugar significantly.
- Oven
- Mixing bowls
- Electric mixer or whisk
- Measuring cups and spoons
- Cupcake pan
- Cupcake liners
- Cooling rack
- Toothpick (for testing doneness)
When it comes to baking the perfect Spring Vanilla Cupcakes, a few expert tips can make all the difference. Here are some chef-approved hacks to elevate your baking game:
- Use Room Temperature Ingredients: Many chefs recommend using room temperature butter, eggs, and milk. This helps create a smoother batter and ensures even mixing, resulting in fluffier cupcakes.
- Don’t Overmix: Once you combine the wet and dry ingredients, mix until just combined. Overmixing can lead to dense cupcakes, so be gentle!
- Check Your Oven Temperature: Ovens can vary in temperature. Use an oven thermometer to ensure your oven is at the correct temperature for baking. This helps achieve the perfect rise and texture.
- Experiment with Flavor: While vanilla is classic, don’t hesitate to add a twist! A teaspoon of almond extract or a hint of citrus zest can enhance the flavor profile of your cupcakes.
- Cool Completely Before Frosting: Allow your cupcakes to cool completely before adding frosting. This prevents the frosting from melting and ensures a beautiful presentation.
By incorporating these tips into your baking routine, you’ll be well on your way to creating Spring Vanilla Cupcakes that are not only delicious but also visually stunning!
To keep your Spring Vanilla Cupcakes fresh and delicious, follow these simple storage and reheating tips:
- Room Temperature: Store cupcakes in an airtight container at room temperature for up to 3 days. This keeps them moist and flavorful.
- Refrigeration: If you need to store them longer, place the cupcakes in the fridge for up to a week. Make sure they are covered to prevent them from drying out.
- Freezing: For longer storage, freeze the cupcakes. Wrap each cupcake individually in plastic wrap and place them in a freezer-safe bag. They can be frozen for up to 3 months.
- Thawing: To enjoy frozen cupcakes, remove them from the freezer and let them thaw at room temperature for about 1-2 hours before serving.
- Reheating: If you prefer warm cupcakes, microwave them for about 10-15 seconds. This will bring back their soft texture without drying them out.
By following these tips, you can enjoy your Spring Vanilla Cupcakes at their best, whether fresh or reheated!
- Overmixing the Batter: Mixing too much can lead to dense cupcakes. Aim for a light hand when combining wet and dry ingredients.
- Skipping the Cooling Step: Frosting warm cupcakes can cause the frosting to melt. Always let them cool completely for the best results.
- Not Measuring Ingredients Accurately: Baking is a science, and precise measurements are crucial. Use measuring cups and spoons for accuracy.
- Using Cold Ingredients: Cold butter or eggs can affect the texture. Allow your ingredients to reach room temperature for a smoother batter.
- Ignoring Oven Temperature: An oven that’s too hot or too cold can ruin your cupcakes. Always preheat and check with an oven thermometer for accuracy.
- Can I use gluten-free flour for a gluten-free version? Yes, you can use gluten-free flour to make these cupcakes suitable for those with gluten sensitivities.
- Do these cupcakes require any special equipment? No, these cupcakes do not require any special equipment; basic baking tools will suffice.
- How do I know when the cupcakes are done? It depends on your oven; always check for doneness with a toothpick inserted into the center. If it comes out clean, they’re ready!
- Can I freeze these cupcakes for later enjoyment? Yes, you can freeze these cupcakes. Just wrap them well and store them in the freezer for future treats.
- Should I skip the cooling step before frosting? No, you should not skip the cooling step before frosting. Allowing them to cool completely ensures the frosting stays intact and doesn’t melt.
Spring Vanilla Cupcakes are not just a treat; they are a celebration of the season, bringing joy and sweetness to any occasion. I hope you find as much delight in baking and sharing these cupcakes as I do. Whether you’re enjoying them at a family gathering or a sunny picnic, they are sure to bring smiles all around. If you try this recipe, I’d love to hear your thoughts! Please share your experiences in the comments below and don’t forget to share this recipe with fellow baking enthusiasts!
PrintSpring Vanilla Cupcakes Recipe

Delicious and fluffy vanilla cupcakes perfect for spring celebrations.
- Prep Time: 15 minutes
- Cook Time: 20 minutes
- Total Time: 35 minutes
- Yield: 12 cupcakes 1x
- Category: Dessert
- Method: Baking
- Cuisine: American
- Diet: Vegetarian
Ingredients
- 1 ½ cups all-purpose flour
- 1 cup granulated sugar
- ½ cup unsalted butter, softened
- 2 large eggs
- 1 cup milk
- 2 teaspoons vanilla extract
- 1 ½ teaspoons baking powder
- ½ teaspoon salt
Instructions
- Preheat your oven to 350°F (175°C) and line a cupcake pan with liners.
- In a large bowl, cream together the softened butter and sugar until light and fluffy.
- Add the eggs one at a time, mixing well after each addition.
- Stir in the vanilla extract.
- In another bowl, whisk together the flour, baking powder, and salt.
- Gradually add the dry ingredients to the wet mixture, alternating with the milk, and mix until just combined.
- Fill the cupcake liners about 2/3 full with the batter.
- Bake for 18-20 minutes or until a toothpick inserted into the center comes out clean.
- Allow the cupcakes to cool completely before frosting.
Discover my list of kitchen tools I always use.
Notes
- For a fun twist, add sprinkles to the batter before baking.
- These cupcakes can be frosted with your favorite buttercream or cream cheese frosting.
- Store leftovers in an airtight container at room temperature for up to 3 days.
Nutrition
- Serving Size: 1 cupcake
- Calories: 200
- Sugar: 15g
- Sodium: 150mg
- Fat: 8g
- Saturated Fat: 5g
- Unsaturated Fat: 2g
- Trans Fat: 0g
- Carbohydrates: 30g
- Fiber: 0g
- Protein: 2g
- Cholesterol: 30mg