Little Debbie Brownies
This post may contain affiliate links
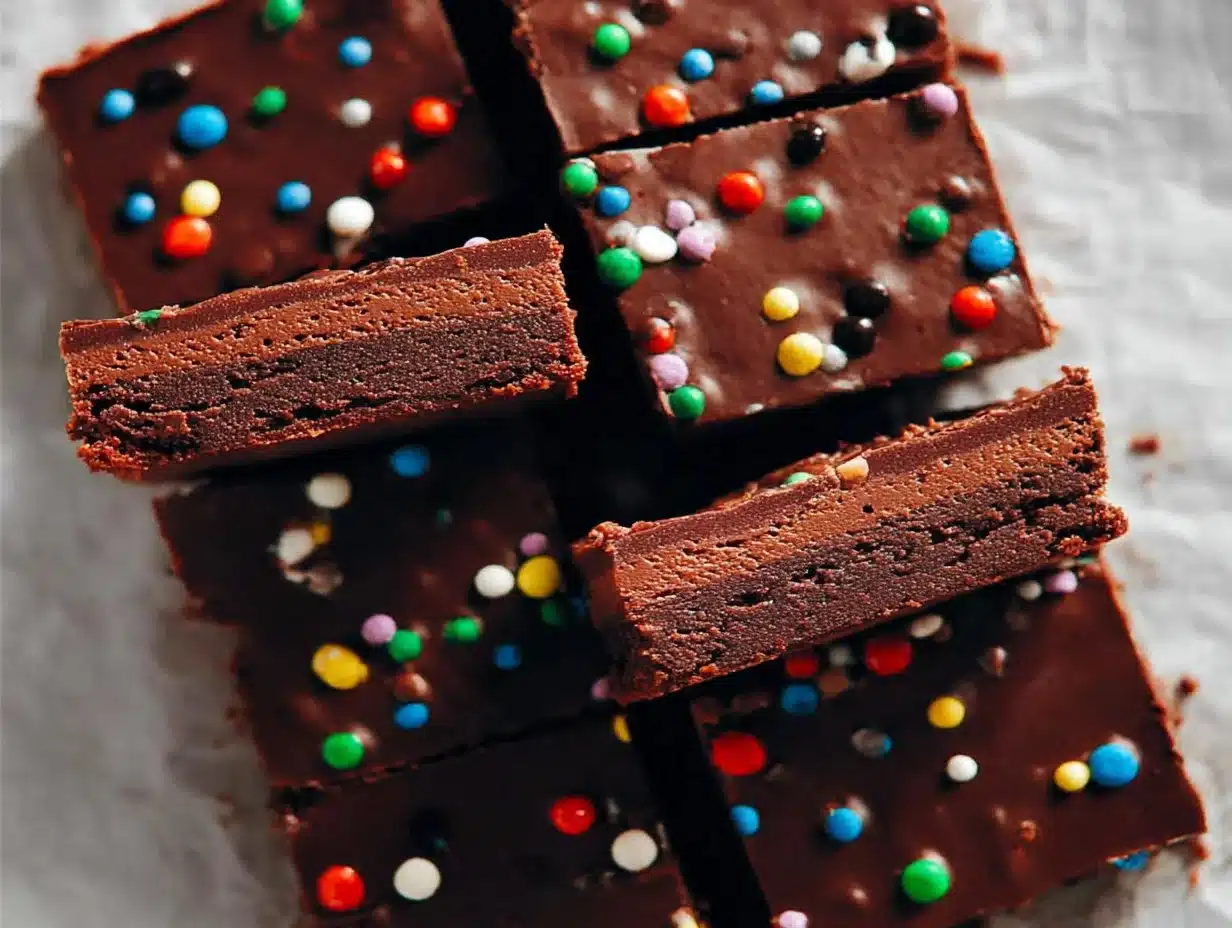
There’s something utterly nostalgic about the aroma of freshly baked brownies wafting through the kitchen. It transports me back to my childhood—watching my mom whip up her famous brownies, and the sheer joy of indulging in gooey squares straight from the pan. Today, I’m thrilled to share my version of those beloved Little Debbie Brownies that combine rich chocolate flavor with a moist, fudgy texture.
These Little Debbie Brownies are not just a treat; they are a celebration of sweetness and family traditions that make any day feel special. You’ll want to dive in right from the pan, savoring each bite as it melts in your mouth.

What is Little Debbie Brownies?
Little Debbie Brownies are a delightful indulgence inspired by the classic snack cakes that many of us grew up loving. But unlike their store-bought counterparts, this homemade version is crafted with love and tailored to suit gluten-free diets without sacrificing flavor or texture. The combination of chocolate, creaminess, and a hint of sweetness celebrates comfort food in every bite.
The beauty of brownies lies in their simplicity; they require just a handful of ingredients but pack a flavor punch. This recipe blends rich cocoa and luscious chocolate to create an irresistible treat that pays homage to the classic Little Debbie Brownies we adore.
Why You’ll Love This Little Debbie Brownies
- Decadent Flavor: With a combination of semi-sweet chocolate and cocoa powder, these brownies deliver a luxurious chocolate experience that will leave you craving more.
- Satisfying Texture: The fudgy interior contrasted with a slight crust on top makes every bite a delightful surprise, appealing to all chocolate lovers.
- Easy to Make: This recipe doesn’t require a bakery’s skills; it’s straightforward, making it perfect for home bakers of any level.
- Family-Friendly: These brownies are a hit with kids and adults alike, perfect for lunchboxes or cozy family gatherings.
Who It’s For
- Busy Families: Perfect for a quick dessert after dinner or packed in lunchboxes.
- Health-Conscious Cooks: A gluten-free option that’s rich in flavor without the need for elaborate dietary adjustments.
- Baking Beginners: An approachable recipe that allows new bakers to shine without pressure.
- Chocolate Lovers: For those who can’t resist rich, chocolatey desserts that soothe the soul.
When to Cook It
- Weeknight Dinners: A perfect sweet ending to a busy day.
- Holiday Gatherings: Impress guests with homemade brownies that evoke nostalgia.
- Cozy Nights: Pair them with a cup of warm cocoa for a delightful evening treat.
- Birthday Parties: Transform dessert time with fun toppings like M&Ms or colorful sprinkles.
How to Make the Perfect Little Debbie Brownies
Ingredients
- 1 cup all purpose gluten free flour (please click thru for info on appropriate blends)
- 1/2 teaspoon xanthan gum ((omit if your blend already contains it))
- 3/4 cup unsweetened cocoa powder ((See Recipe Notes))
- 1/8 teaspoon kosher salt
- 3/4 cup granulated sugar
- 1/2 cup packed light brown sugar
- 8 tablespoons unsalted butter (at room temperature)
- 2 tablespoons neutral oil ((like vegetable, canola or peanut oil))
- 2 teaspoons pure vanilla extract
- 2 tablespoons light corn syrup
- 2 eggs (at room temperature, beaten)
- 8 ounces semi-sweet chocolate (chopped)
- 2/3 cup heavy whipping cream
- 1/8 teaspoon kosher salt
- 3 ounces miniature M&Ms candies or multicolored Sixlets (for decorating (optional))
Step-by-Step Instructions
Prepare the brownies.
- Preheat your oven to 350°F (175°C) and grease a baking pan or line it with parchment paper for easy removal.
- In a bowl, whisk together the gluten-free flour, xanthan gum (if using), cocoa powder, and kosher salt.
- In a separate bowl, cream together the unsalted butter, granulated sugar, and light brown sugar until smooth.
- Add the neutral oil, vanilla extract, and light corn syrup to the butter-sugar mixture, stirring until well combined.
- Beat in the eggs one at a time, ensuring each is fully incorporated before adding the next.
- Gradually add the dry ingredients to the wet mixture, stirring until just combined.
- Fold in the chopped semi-sweet chocolate until evenly distributed.
- Spread the batter into the prepared baking pan and smooth the top.
- Bake for about 25-30 minutes or until a toothpick inserted in the center comes out with a few moist crumbs (not wet batter).
- Let cool completely in the pan before frosting.
Prepare the topping.
- In a saucepan, heat the heavy whipping cream over medium heat until it just begins to simmer.
- Remove from heat and add the remaining chopped chocolate, stirring until melted and smooth.
- Once the brownies are cooled, pour the chocolate ganache over the brownies, spreading it evenly.
- For a festive touch, sprinkle miniature M&Ms or Sixlets on top before the ganache sets.
Storage
- Store leftover brownies in an airtight container at room temperature for up to 3 days.
- For longer storage, refrigerate or freeze, covering the brownies tightly in plastic wrap and then foil.

For People with Diabetes: Sugar Substitutes
If you’re looking to cut down on sugar, suitable sugar-free alternatives include stevia, monk fruit, and allulose. Just be careful to avoid honey or maple syrup, as they can still spike blood sugar levels.
Tools You’ll Need
- Mixing bowls
- Whisk or electric mixer
- Baking pan (9×13 works well)
- Parchment paper (for easy removal)
- Saucepan for melting chocolate
Top Tips from Well-Known Chefs
- Use High-Quality Chocolate: For the ganache, choose a high cocoa percentage chocolate for an intense flavor.
- Don’t Overmix: Once you combine wet and dry ingredients, mix just until no flour is visible to maintain a fudgy texture.
- Chill for Easier Cutting: Allow brownies to chill in the fridge before slicing; it helps achieve neater cuts.
- Experiment with Toppings: Not a fan of M&Ms? Try crushed nuts, coconut flakes, or a drizzle of caramel.
Storing and Reheating Tips
- Fridge: Keep them in an airtight container to prevent drying out.
- Freezer: Wrap individual brownies in plastic wrap and store in a freezer-safe bag for up to 2 months.
- Reheat: For a warm snack, microwave a brownie for 10-15 seconds before enjoying.
Common Mistakes to Avoid
- Using Cold Ingredients: Ensure your eggs and butter are at room temperature for better mixing and texture.
- Overbaking: Keep an eye on the brownies; they should be just baked through for that gooey texture.
- Skipping the Cooling Step: Let the brownies cool completely before garnishing or slicing to avoid a crumbly mess.
FAQs About Little Debbie Brownies
Q: Can I use regular flour instead of gluten-free flour?
Yes, feel free to substitute with regular all-purpose flour if gluten isn’t a concern.
Q: How can I make these brownies dairy-free?
It depends—substituting the butter with a dairy-free option like coconut oil and using dairy-free chocolate will work!
Q: Is it possible to use a different kind of sugar?
Yes, coconut sugar or soft brown sugar can be used, but the texture and taste may vary slightly.
Q: Can I double the recipe?
Yes, it’s easy to double the ingredients; just adjust the baking time depending on the pan size.
Q: Can I eat these brownies warm?
Yes, fresh from the oven they’re particularly indulgent, just be cautious of molten chocolate!

Conclusion: Final Thoughts on Little Debbie Brownies
In just a few simple steps, you can create a batch of Little Debbie Brownies that will have everyone coming back for seconds. They’re perfect for sharing or simply for savoring during quiet moments. I hope you all give this recipe a try, and I’d love to hear your thoughts; feel free to comment or share! Happy baking!
PrintLittle Debbie Brownies
Decadent and fudgy brownies inspired by the beloved Little Debbie snack cakes, perfect for any chocolate lover.
- Prep Time: 15 minutes
- Cook Time: 30 minutes
- Total Time: 45 minutes
- Yield: 16 servings 1x
- Category: Dessert
- Method: Baking
- Cuisine: American
- Diet: Gluten-Free
Ingredients
- 1 cup gluten-free all purpose flour
- 1/2 teaspoon xanthan gum (omit if your blend already contains it)
- 3/4 cup unsweetened cocoa powder
- 1/8 teaspoon kosher salt
- 3/4 cup granulated sugar
- 1/2 cup packed light brown sugar
- 8 tablespoons unsalted butter (at room temperature)
- 2 tablespoons neutral oil
- 2 teaspoons pure vanilla extract
- 2 tablespoons light corn syrup
- 2 large eggs (at room temperature, beaten)
- 8 ounces semi-sweet chocolate (chopped)
- 2/3 cup heavy whipping cream
- 3 ounces miniature M&Ms or multicolored Sixlets (for decorating, optional)
Instructions
- Preheat your oven to 350°F (175°C) and grease a baking pan or line it with parchment paper.
- In a bowl, whisk together the gluten-free flour, xanthan gum (if using), cocoa powder, and kosher salt.
- In a separate bowl, cream together the unsalted butter, granulated sugar, and light brown sugar until smooth.
- Add the neutral oil, vanilla extract, and light corn syrup to the butter-sugar mixture, stirring until well combined.
- Beat in the eggs one at a time, ensuring each is fully incorporated before adding the next.
- Gradually add the dry ingredients to the wet mixture, stirring until just combined.
- Fold in the chopped semi-sweet chocolate until evenly distributed.
- Spread the batter into the prepared baking pan and smooth the top.
- Bake for about 25-30 minutes or until a toothpick inserted in the center comes out with a few moist crumbs.
- Let cool completely in the pan before frosting.
- In a saucepan, heat the heavy whipping cream over medium heat until it just begins to simmer. Remove from heat and add the remaining chopped chocolate, stirring until melted and smooth.
- Pour the chocolate ganache over the brownies, spreading it evenly. Sprinkle with M&Ms or Sixlets if desired.
Notes
Store leftovers in an airtight container at room temperature for up to 3 days, or refrigerate for longer storage.
Nutrition
- Serving Size: 1 brownie
- Calories: 250
- Sugar: 18g
- Sodium: 150mg
- Fat: 12g
- Saturated Fat: 7g
- Unsaturated Fat: 5g
- Trans Fat: 0g
- Carbohydrates: 32g
- Fiber: 3g
- Protein: 3g
- Cholesterol: 40mg