Homemade Gluten-Free English Muffins: A Simple Recipe for Delicious Breakfast Treats

This post may contain affiliate links
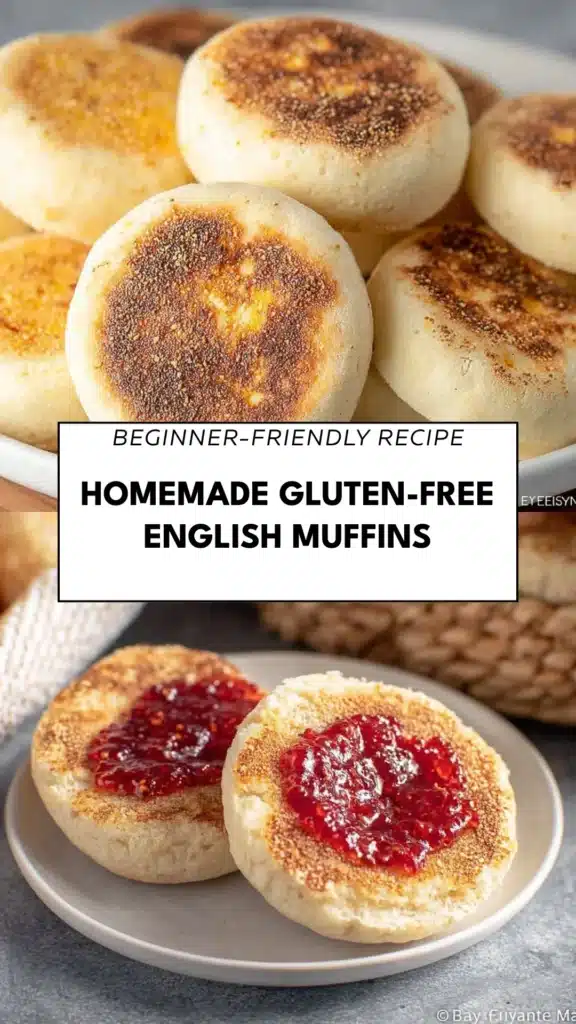
Discover the joy of waking up to the aroma of freshly baked Homemade Gluten-Free English Muffins. There’s something magical about the scent of warm bread wafting through the house, inviting everyone to gather around the breakfast table. These delightful breakfast treats are not just gluten-free; they are a warm hug for your morning routine.
As a passionate home cook, I remember the first time I made these muffins. It was a chilly Sunday morning, and I wanted to create something special for my family. The moment I pulled them out of the oven, golden brown and perfectly puffed, I knew I had struck gold. The kids rushed in, their eyes wide with excitement, and the first bite was met with delighted smiles. It was a simple recipe that brought us together, and it quickly became a weekend tradition.
These muffins are incredibly versatile. You can enjoy them plain, slathered with butter, or topped with your favorite jam. They also make a fantastic base for breakfast sandwiches, filled with eggs and cheese. Plus, they are easy to whip up, making them perfect for busy mornings or leisurely brunches. Whether you’re gluten-free or just looking to try something new, these muffins will surely become a staple in your kitchen.
What is Homemade Gluten-Free English Muffins?
Homemade Gluten-Free English Muffins are a delicious alternative to traditional muffins, originating from the need for gluten-free options in American cuisine. These muffins are not just a substitute; they are a delightful treat in their own right. With roots in English baking, they are fluffy, versatile, and perfect for toasting, making them a beloved breakfast staple.
When I first discovered gluten-free baking, I was amazed at how these muffins could capture the essence of their traditional counterparts. The texture is light and airy, and they toast up beautifully, creating that perfect golden crust. Whether you enjoy them with a smear of butter or as the base for a hearty breakfast sandwich, they never disappoint.
Why You’ll Love This Homemade Gluten-Free English Muffins
- Quick and easy to prepare, perfect for busy mornings.
- Deliciously fluffy texture that rivals traditional muffins.
- Healthier breakfast option with customizable flavors.
- Family-friendly recipe that everyone will enjoy.
Who It’s For
- Ideal for busy families looking for quick breakfast solutions.
- Perfect for health-conscious cooks seeking gluten-free options.
- A must-try for food lovers who appreciate homemade goodness.
When to Cook It
- Perfect for weeknight breakfasts or lazy Sunday brunches.
- Great for special occasions like holiday breakfasts or family gatherings.
- Anytime you crave a warm, toasty treat!
How to Make the Perfect Homemade Gluten-Free English Muffins
Ingredients
- 2 cups gluten-free all-purpose flour
- 1 cup warm milk (or dairy-free alternative)
- 2 tablespoons honey or maple syrup
- 1 tablespoon active dry yeast
- 1 teaspoon salt
- 1/2 teaspoon baking powder
- 1/4 cup melted butter (or coconut oil for dairy-free)
- 1 large egg
Step-by-Step Instructions
- In a small bowl, combine warm milk, honey, and yeast. Let it sit for about 5 minutes until frothy.
- In a large mixing bowl, whisk together the gluten-free flour, salt, and baking powder.
- Add the melted butter and egg to the yeast mixture, then combine with the dry ingredients until a dough forms.
- Cover the bowl with a towel and let the dough rise in a warm place for about 1 hour.
- Preheat your oven to 375°F (190°C) and line a baking sheet with parchment paper.
- Divide the dough into equal portions and shape them into rounds. Place them on the prepared baking sheet.
- Bake for 20-25 minutes or until golden brown on top.
- Let cool before slicing and toasting.
For People with Diabetes: Sugar Substitutes
- Consider using stevia, monk fruit, or allulose as sugar alternatives.
- Avoid honey and maple syrup as they can spike blood sugar levels.
Tools You’ll Need
Before diving into the delightful process of making Homemade Gluten-Free English Muffins, it’s essential to gather the right tools. Having everything at your fingertips not only streamlines the cooking process but also makes it more enjoyable. Here’s a list of the tools you’ll need:
- Mixing bowls: A set of various sizes will help you combine ingredients easily.
- Whisk: Perfect for mixing dry ingredients and incorporating air into your batter.
- Baking sheet: A sturdy baking sheet is crucial for even baking.
- Parchment paper: This will prevent sticking and make cleanup a breeze.
- Measuring cups and spoons: Accurate measurements are key to achieving the perfect texture.
- Towel for covering dough: A clean towel helps keep the dough warm while it rises, ensuring a fluffy muffin.
With these tools in hand, you’re all set to create your own batch of warm, toasty muffins that will fill your kitchen with irresistible aromas. Happy baking!
Top Tips from Well-Known Chefs
As I’ve navigated the world of gluten-free baking, I’ve picked up some invaluable tips from seasoned chefs that can elevate your Homemade Gluten-Free English Muffins to the next level. Here are some expert insights to ensure your muffins turn out perfectly every time:
- Use room temperature ingredients: Bringing your ingredients to room temperature before mixing can significantly improve the texture of your muffins. This allows for better incorporation and a fluffier result.
- Experiment with flavors: Don’t hesitate to get creative! Adding herbs like rosemary or thyme, or even cheese like cheddar or feta, can give your muffins a unique twist. These additions not only enhance the flavor but also make your muffins stand out at the breakfast table.
- Ensure your yeast is fresh: The key to a good rise is using fresh yeast. Always check the expiration date on your yeast packet, and if you’re unsure, perform a quick test by mixing it with warm water and a bit of sugar. If it bubbles and froths, you’re good to go!
By incorporating these tips, you’ll not only improve your baking skills but also create Homemade Gluten-Free English Muffins that are sure to impress your family and friends. Happy baking!
Storing and Reheating Tips
Once you’ve baked your delicious Homemade Gluten-Free English Muffins, you’ll want to ensure they stay fresh and tasty for as long as possible. Here are some practical tips for storing and reheating your muffins:
- Store in an airtight container: Keep your muffins in an airtight container in the fridge for up to 5 days. This will help maintain their moisture and prevent them from drying out.
- Freeze for longer storage: If you want to enjoy your muffins later, freeze them for up to 3 months. Just make sure to wrap each muffin individually in plastic wrap or aluminum foil before placing them in a freezer-safe bag. When you’re ready to enjoy, simply thaw them at room temperature before toasting.
- Reheat for the best texture: To bring back that fresh-baked taste, reheat your muffins in the toaster or oven. For a crispy texture, toast them for a few minutes until they’re warm and golden. This step will revive their delightful crust and fluffy interior.
By following these storing and reheating tips, you can savor the goodness of your Homemade Gluten-Free English Muffins any time you like, making breakfast a breeze even on the busiest of mornings!
Common Mistakes to Avoid
As you embark on your journey to create the perfect Homemade Gluten-Free English Muffins, it’s essential to be aware of common pitfalls that can hinder your baking success. Here are some mistakes to avoid, ensuring your muffins turn out fluffy and delicious every time:
- Not allowing the dough to rise long enough: One of the most crucial steps in making muffins is allowing the dough to rise adequately. If you rush this process, you may end up with dense muffins that lack the light, airy texture we all love. Aim for at least an hour of rising time in a warm place, and don’t be afraid to let it rise a bit longer if needed.
- Using expired yeast: Fresh yeast is vital for achieving that perfect rise. Always check the expiration date on your yeast packet before using it. If you’re unsure about its freshness, perform a quick test by mixing it with warm water and a pinch of sugar. If it bubbles and froths, you’re good to go!
- Overbaking: It’s easy to lose track of time while baking, but overbaking can lead to dry muffins that are far from enjoyable. Keep a close eye on your muffins as they bake, and start checking for doneness a few minutes before the recommended time. They should be golden brown on top and spring back when lightly pressed.
By avoiding these common mistakes, you’ll be well on your way to mastering Homemade Gluten-Free English Muffins that are sure to impress your family and friends. Happy baking!
FAQs About Homemade Gluten-Free English Muffins
As you embark on your journey to create Homemade Gluten-Free English Muffins, you may have some questions. Here are answers to the most common inquiries I receive:
- Can I use dairy-free alternatives for a vegan version? Yes, absolutely! You can substitute the milk with any dairy-free alternative, such as almond milk or oat milk, and use coconut oil instead of butter. This way, you can enjoy a delicious vegan muffin without compromising on taste.
- Do these muffins require any special equipment? No, these muffins do not require any special equipment. A mixing bowl, whisk, and a baking sheet are all you need to whip up this delightful recipe. It’s perfect for home cooks of all skill levels!
- Will baking times vary depending on my oven? Yes, it depends on your oven; baking times may vary slightly. I recommend checking your muffins a few minutes before the suggested time to ensure they don’t overbake. Every oven is different, so keep an eye on them!
- Can I add seeds or nuts for extra texture? Yes, you can add seeds or nuts for extra texture! Chia seeds, sunflower seeds, or chopped walnuts can enhance the flavor and provide a delightful crunch. Just be sure to adjust the dry ingredients slightly if you add a significant amount.
- Can I freeze these muffins after toasting? No, these muffins are not suitable for freezing after toasting. It’s best to freeze them before toasting. Once thawed, you can toast them for a fresh, warm treat whenever you like!
With these FAQs answered, you’re now equipped with the knowledge to create your own Homemade Gluten-Free English Muffins. Enjoy the process and happy baking!
Conclusion: Final Thoughts on Homemade Gluten-Free English Muffins
As you wrap up your journey of creating Homemade Gluten-Free English Muffins, I hope you feel a sense of accomplishment and joy. There’s something truly special about baking from scratch, especially when it results in warm, fluffy muffins that can brighten any morning.
These muffins are not just a gluten-free alternative; they are a delicious addition to your breakfast repertoire. Whether you enjoy them with a simple pat of butter, a dollop of jam, or as the base for a hearty breakfast sandwich, they are sure to please everyone at your table.
I encourage you to experiment with flavors and toppings, making this recipe your own. Perhaps you’ll add herbs, cheese, or even a sprinkle of cinnamon for a sweet twist. The possibilities are endless, and each batch can be a new adventure in your kitchen.
Don’t forget to share your experiences in the comments! I love hearing how my recipes come to life in your homes. Your feedback and stories inspire me to keep creating and sharing. Happy baking, and may your mornings be filled with the delightful aroma of Homemade Gluten-Free English Muffins!
PrintHomemade Gluten-Free English Muffins: A Simple Recipe for Delicious Breakfast Treats

A simple recipe for delicious breakfast treats that are gluten-free.
- Prep Time: 15 minutes
- Cook Time: 25 minutes
- Total Time: 1 hour 40 minutes
- Yield: 6 muffins 1x
- Category: Breakfast
- Method: Baking
- Cuisine: American
- Diet: Gluten Free
Ingredients
- 2 cups gluten-free all-purpose flour
- 1 cup warm milk (or dairy-free alternative)
- 2 tablespoons honey or maple syrup
- 1 tablespoon active dry yeast
- 1 teaspoon salt
- 1/2 teaspoon baking powder
- 1/4 cup melted butter (or coconut oil for dairy-free)
- 1 large egg
Instructions
- In a small bowl, combine warm milk, honey, and yeast. Let it sit for about 5 minutes until frothy.
- In a large mixing bowl, whisk together the gluten-free flour, salt, and baking powder.
- Add the melted butter and egg to the yeast mixture, then combine with the dry ingredients until a dough forms.
- Cover the bowl with a towel and let the dough rise in a warm place for about 1 hour.
- Preheat your oven to 375°F (190°C) and line a baking sheet with parchment paper.
- Divide the dough into equal portions and shape them into rounds. Place them on the prepared baking sheet.
- Bake for 20-25 minutes or until golden brown on top.
- Let cool before slicing and toasting.
Notes
- For a sweeter muffin, add a bit more honey or maple syrup.
- These muffins can be frozen for later use.
- Experiment with adding herbs or cheese for different flavors.
Nutrition
- Serving Size: 1 muffin
- Calories: 180
- Sugar: 5g
- Sodium: 200mg
- Fat: 7g
- Saturated Fat: 3g
- Unsaturated Fat: 4g
- Trans Fat: 0g
- Carbohydrates: 25g
- Fiber: 2g
- Protein: 4g
- Cholesterol: 30mg


