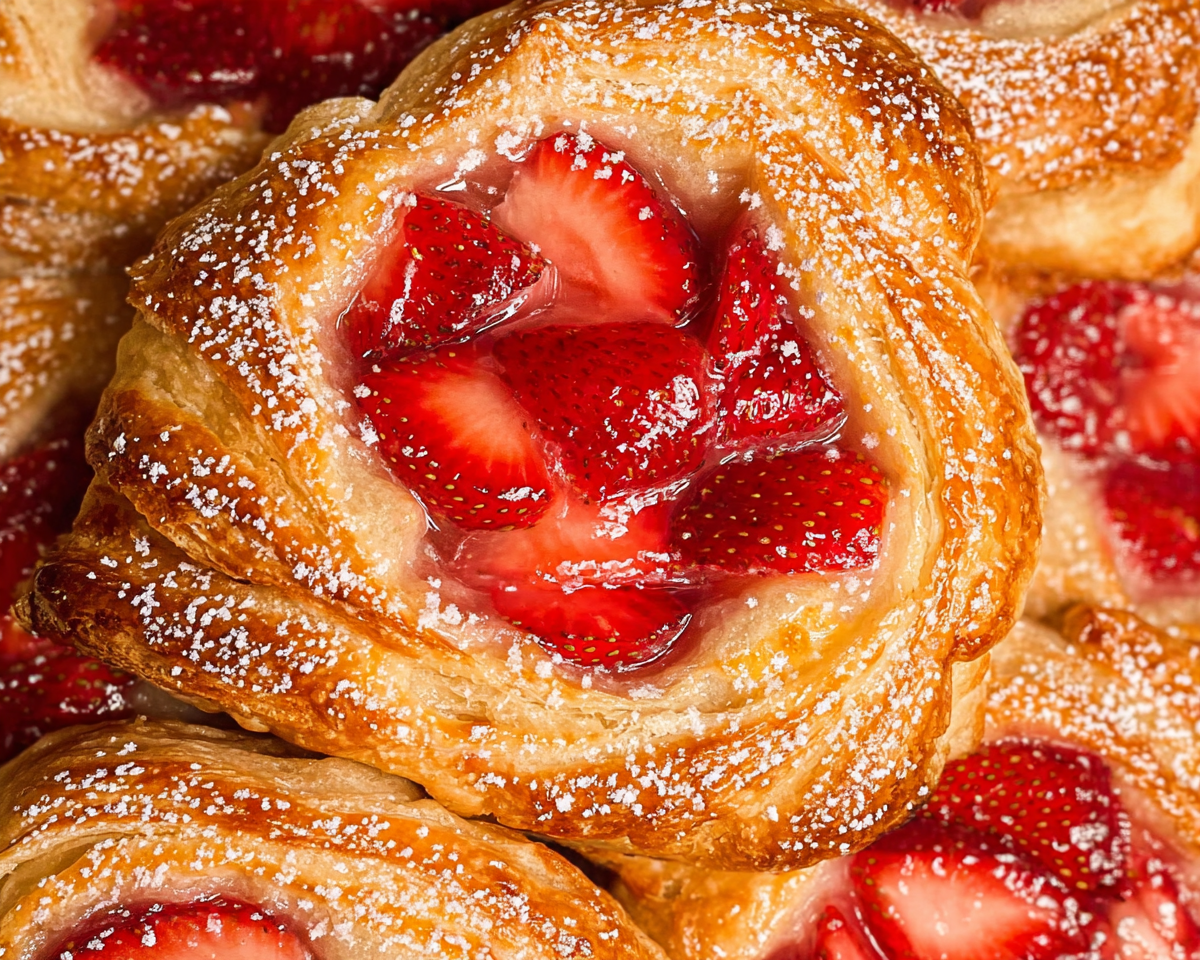
Gluten-Free Strawberry Danish Recipe
This post may contain affiliate links
As a passionate home cook, I find joy in creating delightful treats that everyone can enjoy, especially when it comes to my Gluten-Free Strawberry Danish. This recipe is close to my heart, as it reminds me of sunny mornings spent in my grandmother’s kitchen, where the aroma of fresh pastries filled the air. The flaky layers of this Gluten-Free Strawberry Danish are perfectly complemented by the sweet, juicy strawberries, making it an irresistible choice for breakfast or dessert. With just a few simple ingredients, you can bring a taste of the bakery into your home, creating memories that will last a lifetime.
What is Gluten-Free Strawberry Danish?
The Gluten-Free Strawberry Danish is a delightful twist on a classic pastry that has its roots in Denmark, where the term “Danish” refers to a variety of sweet pastries. Traditionally, these pastries are made with a flaky, buttery dough that is layered and folded to create a light, airy texture. The beauty of this gluten-free version lies in its ability to capture that same flaky goodness while accommodating those with gluten sensitivities.
In Denmark, Danishes are often filled with fruit, custard, or cream cheese, making them a versatile treat enjoyed at breakfast or as a dessert. The use of fresh strawberries in this recipe not only adds a burst of flavor but also brings a touch of summer to your table, making it a perfect choice for any occasion. This strawberry Danish recipe is not just about taste; it’s about celebrating the joy of baking and sharing delicious moments with loved ones.
As I crafted this recipe, I wanted to ensure that it remained approachable for home cooks while still delivering that bakery-style experience. The combination of fresh strawberries and a flaky pastry creates a delightful contrast of textures, making each bite a celebration of flavor. Whether you’re looking for strawberry dessert ideas or a quick breakfast pastry, this gluten-free Danish is sure to impress.
Why You’ll Love This Gluten-Free Strawberry Danish
- Convenient and Quick: This easy puff pastry dessert comes together in just 45 minutes, making it perfect for busy mornings or last-minute gatherings.
- Deliciously Sweet: The combination of fresh strawberries and flaky pastry creates a mouthwatering treat that will satisfy your sweet tooth.
- Health-Conscious Option: Made with gluten-free ingredients, this Danish is a great choice for those with dietary restrictions, allowing everyone to indulge without worry.
- Family-Friendly: Kids and adults alike will love these pastries, making them a hit at breakfast or as an after-school snack.
- Versatile Treat: You can easily customize the filling with other fruits or even cream cheese, ensuring there’s something for everyone!
Who It’s For
This Gluten-Free Strawberry Danish is perfect for busy families looking for a quick yet delicious breakfast option. It’s also ideal for health-conscious cooks who want to enjoy a sweet treat without gluten. Food lovers will appreciate the bakery-style quality of this homemade Danish pastry, making it a delightful addition to any brunch or dessert table.
When to Cook It
Enjoy this delightful Danish for a variety of occasions! It’s perfect for weeknight breakfasts when you want something special to start the day. Serve it at brunch gatherings with friends or family, and watch as everyone reaches for seconds. You can even whip it up for special celebrations, adding a touch of sweetness to birthdays or holiday feasts.
How to Make the Perfect Gluten-Free Strawberry Danish
Ingredients
To create this delightful Gluten-Free Strawberry Danish, you’ll need a handful of simple ingredients that come together to form a delicious pastry. Here’s what you’ll need:
- 1 cup gluten-free all-purpose flour: This is the base of your pastry. Make sure to choose a blend that includes xanthan gum for better texture.
- 1/2 cup unsalted butter, cold and cubed: Cold butter is key for flaky layers. You can substitute with vegan butter for a dairy-free option.
- 1/4 cup sugar: This adds sweetness to the dough. Feel free to use coconut sugar for a healthier alternative.
- 1/4 teaspoon salt: A pinch of salt enhances the flavors.
- 1/4 cup cold water: This helps bring the dough together. You can use milk or a dairy-free alternative if you prefer.
- 1 cup fresh strawberries, sliced: The star of the show! You can swap these for blueberries or raspberries if you like.
- 1 tablespoon cornstarch: This thickens the strawberry filling and keeps it from being too runny.
- 1 tablespoon lemon juice: A splash of acidity brightens the flavor of the strawberries.
- 1 egg, beaten (for egg wash): This gives your Danish a beautiful golden finish. For a vegan option, use a mixture of plant-based milk and a bit of cornstarch.
Step-by-Step Instructions
Now that you have your ingredients ready, let’s dive into the process of making this easy puff pastry dessert. Follow these steps for a bakery-style Danish pastry:
- Preheat your oven: Set it to 375°F (190°C) to ensure it’s hot and ready for baking.
- Mix the dry ingredients: In a mixing bowl, combine the gluten-free flour, sugar, and salt.
- Add the butter: Incorporate the cold, cubed butter into the flour mixture until it resembles coarse crumbs. This step is crucial for achieving that flaky texture.
- Bring the dough together: Gradually add cold water, mixing until the dough forms. It should be slightly sticky but manageable.
- Roll out the dough: On a floured surface, roll out the dough and cut it into squares, about 4 inches each.
- Prepare the filling: In another bowl, mix the sliced strawberries with cornstarch and lemon juice until well combined.
- Assemble the Danishes: Place a spoonful of the strawberry mixture in the center of each square. Fold the corners over the filling to create a lovely Danish shape.
- Brush with egg wash: Gently brush the tops with the beaten egg for that golden finish.
- Bake: Place the pastries on a baking sheet and bake for 20-25 minutes or until they are golden brown and puffed up.
Discover my list of kitchen tools I always use.
For People with Diabetes: Sugar Substitutes
If you’re looking for sugar substitutes, consider using stevia, monk fruit, erythritol, or allulose. These options provide sweetness without the blood sugar spike. However, it’s best to avoid honey or maple syrup, as they can raise blood sugar levels.
Tools You’ll Need
To make your Gluten-Free Strawberry Danish a success, having the right tools on hand can make all the difference. Here’s a list of essential kitchen tools you’ll need, along with some easy alternatives:
- Mixing Bowls: A set of various sizes is ideal. If you don’t have mixing bowls, any large, deep dish will work.
- Rolling Pin: This is essential for rolling out your dough. If you don’t have one, a clean wine bottle can serve as a great substitute!
- Baking Sheet: A standard baking sheet is perfect for your pastries. If you don’t have one, a large oven-safe dish can also do the trick.
- Parchment Paper: This helps prevent sticking and makes cleanup easier. If you’re out of parchment paper, lightly greasing your baking sheet will work as well.
- Pastry Brush: For applying the egg wash. If you don’t have one, a clean, soft cloth or paper towel can be used to dab the egg wash on.
- Measuring Cups and Spoons: Accurate measurements are key to baking success. If you don’t have these, you can use any standard cup or spoon as a rough guide.
Tips from Well-Known Chefs
When it comes to baking the perfect Gluten-Free Strawberry Danish, I’ve gathered some invaluable tips from renowned chefs that can elevate your pastry game. These expert-approved hacks will help you achieve that bakery-style finish right in your own kitchen:
- Chill Your Ingredients: Many chefs emphasize the importance of keeping your butter and water cold. This helps create those flaky layers that are characteristic of a great Danish. Consider chilling your mixing bowl and utensils as well for an extra boost!
- Don’t Overwork the Dough: Chef Julia Child once said, “Baking is like love; it should be entered into with abandon or not at all.” This rings true for your dough! Mix just until combined to avoid tough pastries.
- Experiment with Flavors: Chef Thomas Keller encourages creativity in the kitchen. Feel free to add a splash of vanilla extract or almond extract to your dough for an extra layer of flavor. You can also mix in spices like cinnamon for a warm twist.
- Use Fresh Ingredients: Chef Ina Garten always insists on using the best quality ingredients. Fresh strawberries will not only enhance the flavor but also provide a beautiful presentation. If strawberries are out of season, consider using frozen ones, but make sure to thaw and drain them well.
- Brush with Care: When applying the egg wash, Chef Gordon Ramsay suggests using a light hand. A gentle brush will give your Danish a beautiful golden color without weighing it down.
By incorporating these tips from culinary experts, you’ll be well on your way to mastering the art of homemade Danish pastries. Happy baking!
Delicious Variations to Customize Your Danish
One of the best things about making your own Danish pastries is the ability to customize them to suit your taste or dietary needs. Here are some delightful variations to inspire your creativity:
- Berry Medley: Instead of just strawberries, mix in other berries like blueberries, raspberries, or blackberries for a vibrant, colorful filling. The combination of flavors will create a delightful burst in every bite.
- Peach and Cream Cheese: Swap the strawberries for fresh peaches and add a dollop of cream cheese mixed with a bit of sugar and vanilla extract. This combination offers a creamy, sweet contrast to the flaky pastry.
- Chocolate Hazelnut: For a decadent twist, spread a thin layer of chocolate hazelnut spread on the dough before adding your fruit filling. This rich addition will satisfy any chocolate lover’s cravings.
- Apple Cinnamon: Use thinly sliced apples mixed with cinnamon and a touch of sugar for a warm, comforting filling. This variation is perfect for fall and pairs beautifully with a sprinkle of powdered sugar on top.
- Nutty Delight: Incorporate chopped nuts like almonds or walnuts into your fruit filling for added crunch and flavor. This not only enhances the texture but also adds a nutritious element to your pastries.
- Vegan Option: To make a vegan version, substitute the butter with coconut oil or a plant-based butter alternative, and use a flax egg instead of the regular egg wash. You can also use almond milk for a dairy-free option.
These variations not only allow you to explore different flavors but also cater to various dietary preferences. Feel free to mix and match ingredients based on what you have on hand or what you love most. The possibilities are endless, and each variation brings its own unique charm to your homemade pastries!
Top Tips for Perfecting Your Gluten-Free Strawberry Danish
Creating the perfect Gluten-Free Strawberry Danish is all about attention to detail and a few expert techniques that can elevate your baking game. Here are some invaluable tips and cooking hacks that I’ve gathered over the years, along with some cultural secrets that will help you achieve that flaky, bakery-style pastry right in your own kitchen:
- Use Quality Gluten-Free Flour: Not all gluten-free flours are created equal. Opt for a high-quality blend that includes xanthan gum, which helps mimic the elasticity of traditional flour. This will ensure your pastry has the right texture and structure.
- Keep Everything Cold: For the flakiest layers, it’s crucial to keep your butter and water cold. Consider chilling your mixing bowl and utensils as well. This prevents the butter from melting too quickly, allowing for those beautiful layers to form during baking.
- Don’t Overmix: When combining your ingredients, mix just until they come together. Overmixing can lead to tough pastries, which is the opposite of what we want. Think of it as a gentle embrace rather than a vigorous workout!
- Experiment with Fillings: While strawberries are delightful, don’t hesitate to explore other fillings. Traditional Danish pastries often feature a variety of fruits, custards, or even savory options. This flexibility allows you to cater to different tastes and seasonal ingredients.
- Brush with Egg Wash: For that golden, glossy finish, apply an egg wash before baking. Use a light hand to avoid weighing down the pastry. If you’re making a vegan version, a mixture of plant-based milk and a bit of cornstarch works beautifully.
- Let Them Cool: After baking, allow your Danishes to cool on a wire rack. This prevents them from becoming soggy and helps maintain that delightful flaky texture. Plus, the cooling process allows the filling to set, making them easier to handle.
- Serve Fresh: Danish pastries are best enjoyed fresh out of the oven. If you have leftovers, store them in an airtight container and reheat them in the oven for a few minutes to restore their crispiness.
- Embrace Cultural Traditions: In Denmark, pastries are often enjoyed with coffee or tea, making them a delightful treat for afternoon gatherings. Consider serving your Gluten-Free Strawberry Danish with a warm beverage for a cozy experience that pays homage to its roots.
By incorporating these expert techniques and cultural insights, you’ll be well on your way to mastering the art of gluten-free baking. Each tip is designed to enhance your experience and ensure that your Gluten-Free Strawberry Danish turns out perfectly every time. Happy baking!
Storing and Reheating Tips
To keep your Gluten-Free Strawberry Danish fresh and delicious, proper storage and reheating techniques are essential. Here’s how to ensure your pastries maintain their delightful texture and flavor:
Storing in the Fridge
- Cool Completely: Allow your Danishes to cool completely at room temperature before storing. This prevents condensation from forming, which can make them soggy.
- Airtight Container: Place the cooled pastries in an airtight container. This will help keep them fresh for up to 3 days in the refrigerator.
- Layering: If you have multiple Danishes, consider placing parchment paper between layers to prevent them from sticking together.
Freezing for Longer Storage
- Wrap Individually: For longer storage, wrap each Danish tightly in plastic wrap or aluminum foil. This helps prevent freezer burn and keeps them fresh.
- Use a Freezer Bag: Place the wrapped pastries in a freezer-safe bag, removing as much air as possible. They can be stored in the freezer for up to 2 months.
- Label and Date: Don’t forget to label your bag with the date so you can keep track of freshness.
Reheating Your Danishes
- Oven Method: For the best results, preheat your oven to 350°F (175°C). Place the Danishes on a baking sheet and heat for about 10-15 minutes, or until warmed through and crispy.
- Microwave Method: If you’re in a hurry, you can use the microwave. Heat on a microwave-safe plate for about 20-30 seconds. However, this method may result in a softer pastry.
- Toaster Oven: A toaster oven is a great option for reheating. Set it to 350°F (175°C) and heat for about 5-10 minutes for a crispy finish.
By following these storing and reheating tips, you can enjoy your Gluten-Free Strawberry Danish at its best, whether it’s fresh out of the oven or warmed up later. Happy baking!
Helpful Notes
As you embark on your journey to create the perfect Gluten-Free Strawberry Danish, here are some extra clarifications and tips to ensure your baking experience is smooth and enjoyable:
Ingredient Prep
- Fresh Strawberries: When selecting strawberries, look for ones that are bright red and firm. Avoid any that are overly soft or have blemishes. Rinse them gently under cold water and pat dry before slicing.
- Butter Temperature: For the best results, ensure your butter is cold and cubed. This helps create those flaky layers that are characteristic of a great Danish. If you forget to take it out of the fridge, you can cut it into smaller pieces to chill it faster.
- Flour Measurement: When measuring gluten-free flour, spoon it into your measuring cup and level it off with a knife. Avoid packing it down, as this can lead to using too much flour and a dense pastry.
Substitutions
- Gluten-Free Flour: If you don’t have a gluten-free all-purpose flour blend, you can make your own by combining equal parts of almond flour, coconut flour, and tapioca flour. Just be aware that the texture may vary slightly.
- Butter Alternatives: For a dairy-free option, use coconut oil or a plant-based butter substitute. Just ensure it’s cold, similar to regular butter, for the best texture.
- Sweeteners: If you prefer a lower-sugar option, consider using a sugar substitute like erythritol or monk fruit sweetener in place of regular sugar. Adjust the quantity according to the sweetness level of the substitute.
Cultural References
The Danish pastry has a rich history that dates back to the 19th century in Denmark. It was influenced by Austrian bakers who brought their techniques to the country. Today, Danishes are enjoyed worldwide, often filled with a variety of fruits, custards, or even savory ingredients. In Denmark, it’s common to enjoy these pastries with a cup of coffee, making them a beloved treat during afternoon breaks.
By keeping these helpful notes in mind, you’ll be well-equipped to create a delicious Gluten-Free Strawberry Danish that not only tastes amazing but also honors the cultural heritage of this delightful pastry. Happy baking!
Common Mistakes to Avoid
When making your Gluten-Free Strawberry Danish, it’s easy to encounter a few pitfalls that can affect the final result. Here are some common mistakes to watch out for, along with tips to ensure your pastries turn out perfectly every time:
- Using the Wrong Flour: Not all gluten-free flours are created equal. Make sure to use a blend that includes xanthan gum for the best texture. Avoid using single flours like almond or coconut flour alone, as they won’t provide the same structure.
- Overworking the Dough: It’s tempting to mix the dough until it’s completely smooth, but overworking can lead to tough pastries. Mix just until combined for that flaky texture we all love.
- Skipping the Chilling Step: Cold ingredients are crucial for achieving flaky layers. Don’t skip chilling your butter and water, and consider chilling your mixing bowl and utensils as well.
- Not Measuring Ingredients Accurately: Baking is a science, and precise measurements are key. Use a kitchen scale for the most accurate results, especially when measuring gluten-free flour.
- Ignoring the Cooling Time: Allow your Danishes to cool on a wire rack after baking. This prevents them from becoming soggy and helps maintain that delightful flaky texture.
FAQs About Gluten-Free Strawberry Danish
- Can I use frozen strawberries for this gluten-free strawberry Danish? Yes, you can use frozen strawberries! Just make sure to thaw and drain them well to avoid excess moisture in your filling.
- Is this strawberry Danish recipe suitable for a quick breakfast pastry? Yes, this strawberry Danish recipe is perfect for a quick breakfast pastry. It takes only 45 minutes from start to finish, making it an ideal choice for busy mornings.
- Can I substitute the gluten-free flour with regular flour? No, this recipe is specifically designed for gluten-free flour. Using regular flour will not yield the same results and will not be suitable for those with gluten sensitivities.
- Is it possible to make homemade Danish pastries without butter? It depends. You can substitute butter with vegan butter or coconut oil for a dairy-free option, but the texture may vary slightly.
- Are there other fruit options for this gluten-free Danish? Yes, you can easily swap strawberries with other fruits like blueberries, raspberries, or even peaches for a delicious twist on this easy puff pastry dessert.
Conclusion: Final Thoughts on Gluten-Free Strawberry Danish
Creating a Gluten-Free Strawberry Danish is not just about baking; it’s about sharing love and joy with those around you. Each flaky layer and sweet strawberry filling tells a story of warmth and togetherness, reminiscent of cherished moments in the kitchen. I encourage you to try this recipe and make it your own, experimenting with flavors and fillings that resonate with your family. If you enjoyed this recipe, please share your thoughts in the comments below or share it with friends who would love to indulge in this delightful treat. Happy baking!
PrintGluten-Free Strawberry Danish Recipe
A delicious and easy-to-make gluten-free strawberry Danish pastry that is perfect for breakfast or dessert.
- Prep Time: 20 minutes
- Cook Time: 25 minutes
- Total Time: 45 minutes
- Yield: 8 servings 1x
- Category: Dessert
- Method: Baking
- Cuisine: American
- Diet: Gluten Free
Ingredients
- 1 cup gluten-free all-purpose flour
- 1/2 cup unsalted butter, cold and cubed
- 1/4 cup sugar
- 1/4 teaspoon salt
- 1/4 cup cold water
- 1 cup fresh strawberries, sliced
- 1 tablespoon cornstarch
- 1 tablespoon lemon juice
- 1 egg, beaten (for egg wash)
Instructions
- Preheat your oven to 375°F (190°C).
- In a mixing bowl, combine the gluten-free flour, sugar, and salt.
- Add the cold butter and mix until the mixture resembles coarse crumbs.
- Gradually add cold water until the dough comes together.
- Roll out the dough on a floured surface and cut into squares.
- In another bowl, mix the sliced strawberries with cornstarch and lemon juice.
- Place a spoonful of the strawberry mixture in the center of each square.
- Fold the corners of the dough over the filling to create a Danish shape.
- Brush the tops with beaten egg.
- Bake for 20-25 minutes or until golden brown.
Discover my list of kitchen tools I always use.
Notes
- Make sure to use gluten-free certified ingredients.
- Feel free to substitute strawberries with other fruits.
- These pastries are best served fresh.
Nutrition
- Serving Size: 1 Danish
- Calories: 250
- Sugar: 10g
- Sodium: 150mg
- Fat: 15g
- Saturated Fat: 9g
- Unsaturated Fat: 6g
- Trans Fat: 0g
- Carbohydrates: 30g
- Fiber: 2g
- Protein: 3g
- Cholesterol: 40mg


