GF Pop Tarts: Easy Gluten-Free Recipe for Delicious Homemade Treats

This post may contain affiliate links
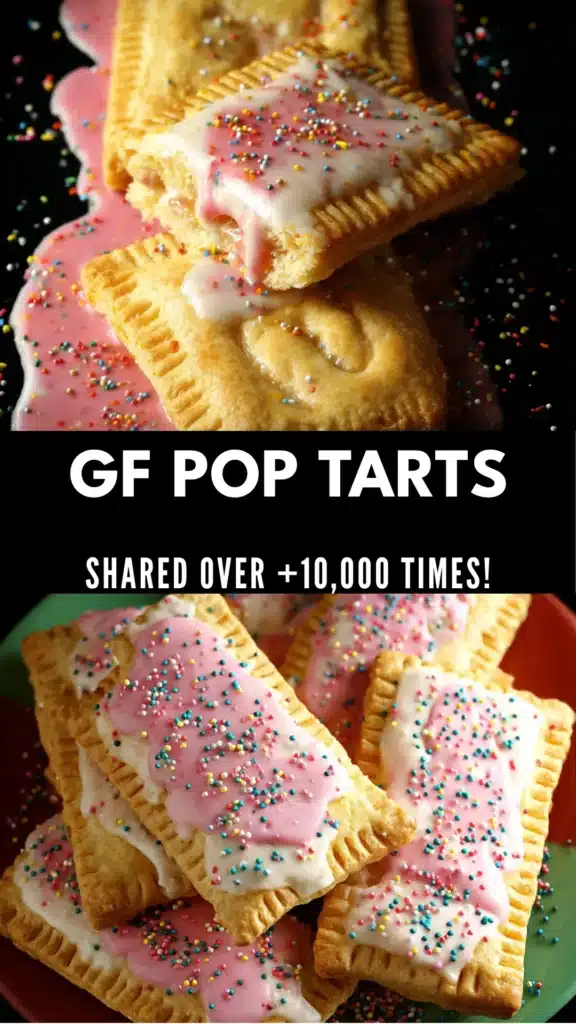
Welcome to the delightful world of homemade GF Pop Tarts! If you’re like me, you probably have fond memories of enjoying these sweet pastries as a child. The good news is that you can recreate that nostalgia in a gluten-free version that everyone can enjoy. These gluten-free pop tarts are not just a treat; they’re a celebration of flavors and textures that can brighten up any morning or snack time.
Imagine biting into a flaky, golden crust that gives way to a luscious filling of your favorite fruit jam. The aroma wafting through your kitchen as they bake is simply irresistible. Whether you’re preparing them for a busy breakfast or a cozy afternoon snack, these pop tarts are sure to bring smiles to your family’s faces.
What I love most about making GF Pop Tarts at home is the ability to customize them. You can choose from a variety of fillings, from classic strawberry to rich chocolate, making them a versatile option for any palate. Plus, they’re a fun baking project that you can enjoy with your kids, creating lasting memories in the kitchen.
So, roll up your sleeves and let’s dive into this easy recipe that will have you whipping up delicious homemade treats in no time!
What is GF Pop Tarts?
GF Pop Tarts are a delightful gluten-free twist on the classic pastry that has been a staple in American breakfast culture for decades. These treats are not just a nostalgic nod to childhood; they are a versatile dessert option that can be enjoyed at any time of the day. With a flaky, buttery crust and a variety of sweet fillings, they are perfect for satisfying your cravings.
Traditionally, pop tarts are filled with fruit jams, but the beauty of making them at home is the freedom to experiment. You can fill them with anything from rich chocolate spreads to nut butters, making them a canvas for your culinary creativity. The result is a deliciously satisfying treat that can cater to any taste preference.
Why You’ll Love This GF Pop Tarts
- Quick and easy to make, perfect for busy mornings when you need a sweet pick-me-up.
- Customizable with your favorite fillings, from classic jams to decadent chocolate.
- A fun baking project for families and kids to enjoy together, creating memories in the kitchen.
Who It’s For
- Ideal for gluten-sensitive individuals who miss out on traditional pastries.
- Perfect for families looking for tasty alternatives that everyone can enjoy.
- A great option for food lovers who appreciate homemade treats and want to explore new flavors.
When to Cook It
- Great for weekend brunches when you want to impress your family with a homemade treat.
- Perfect as an after-school snack that kids will love.
- Ideal for special occasions like birthdays, where you can customize the fillings to match the theme.
How to Make the Perfect GF Pop Tarts
Ingredients
- 2 cups gluten-free all-purpose flour
- 1/2 cup unsalted butter, chilled and cubed
- 1/4 cup granulated sugar
- 1/4 teaspoon salt
- 1/4 cup cold water
- 1/2 cup fruit jam or filling of choice
- 1 egg, beaten (for egg wash)
- Powdered sugar (for icing, optional)
- Milk (for icing, optional)
Step-by-Step Instructions
- In a large bowl, mix the gluten-free flour, sugar, and salt.
- Add the chilled butter and mix until the mixture resembles coarse crumbs.
- Gradually add cold water until the dough comes together.
- Divide the dough into two balls, flatten them into disks, and wrap in plastic wrap. Refrigerate for at least 30 minutes.
- Preheat the oven to 350°F (175°C).
- Roll out one disk of dough on a floured surface to about 1/8 inch thick.
- Cut the dough into rectangles and place half of them on a baking sheet lined with parchment paper.
- Place a spoonful of jam in the center of each rectangle.
- Top with another rectangle of dough and seal the edges with a fork.
- Brush the tops with beaten egg and make a few slits for steam to escape.
- Bake for 20-25 minutes or until golden brown.
- Let cool before icing with a mixture of powdered sugar and milk, if desired.
For People with Diabetes: Sugar Substitutes
Consider using stevia, monk fruit, or allulose as sugar alternatives; avoid honey and maple syrup due to high sugar content.
Tools You’ll Need
Before you start whipping up your delicious GF Pop Tarts, it’s essential to gather all the necessary tools. Having the right equipment can make the process smoother and more enjoyable. Here’s what you’ll need:
- Mixing bowl: A large bowl is perfect for combining your dry ingredients and mixing in the butter.
- Rolling pin: This will help you roll out the dough to the perfect thickness for your pop tarts.
- Baking sheet: A sturdy baking sheet is essential for holding your pop tarts while they bake.
- Parchment paper: Line your baking sheet with parchment paper to prevent sticking and make cleanup a breeze.
- Fork: Use a fork to seal the edges of your pop tarts and create a decorative pattern on top.
- Plastic wrap: This is useful for wrapping your dough while it chills in the refrigerator.
With these tools at your side, you’ll be well-equipped to create your own batch of homemade gluten-free pop tarts. Happy baking!
Top Tips from Well-Known Chefs
As I’ve learned from my culinary journey, a few expert tips can elevate your GF Pop Tarts from good to extraordinary. Here are some insights from well-known chefs that I’ve found invaluable:
- Use chilled ingredients: Keeping your butter and water cold is crucial for achieving a flaky crust. When the fat is cold, it creates steam during baking, resulting in a light and airy texture. So, don’t rush this step—chill your ingredients before you start mixing!
- Experiment with different fillings: The beauty of homemade gluten-free pop tarts lies in their versatility. While fruit jams are classic, consider trying chocolate spreads, nut butters, or even savory fillings like cheese and herbs. Each variation can bring a new twist to your pop tarts, making them exciting every time you bake.
- Don’t skip the egg wash: Brushing the tops of your pop tarts with a beaten egg before baking not only gives them a beautiful golden finish but also adds a slight sheen. This simple step can make your homemade treats look as good as they taste, impressing family and friends alike.
By incorporating these tips into your baking routine, you’ll be well on your way to mastering the art of GF Pop Tarts. Happy baking!
Storing and Reheating Tips
Once you’ve baked your delicious GF Pop Tarts, you might be wondering how to keep them fresh for as long as possible. Here are some simple tips to ensure your homemade treats stay tasty:
- Store leftovers: Keep any uneaten pop tarts in an airtight container at room temperature. They will stay fresh for up to 3 days. This way, you can enjoy them as a quick snack or breakfast option throughout the week.
- Freeze for longer storage: If you want to keep your gluten-free pop tarts for an extended period, freezing is a great option. Wrap each pop tart individually in plastic wrap and then place them in a freezer-safe bag or container. They can be stored in the freezer for up to 3 months.
- Reheat for best results: When you’re ready to enjoy a frozen pop tart, the best way to reheat it is in the oven. Preheat your oven to 350°F (175°C) and bake the pop tart for about 10-15 minutes, or until heated through. This method helps restore the flaky texture and deliciousness of your homemade treat.
By following these storing and reheating tips, you can savor your GF Pop Tarts at their best, ensuring that every bite is as delightful as the first!
Common Mistakes to Avoid
As you embark on your journey to create the perfect GF Pop Tarts, it’s essential to be aware of some common pitfalls that can affect the outcome of your delicious treats. Here are a few mistakes to avoid, ensuring your pop tarts turn out flaky and flavorful:
- Overworking the dough: One of the most common mistakes is overmixing or overworking the dough. This can lead to tough pop tarts instead of the tender, flaky texture we all love. When mixing the ingredients, aim for a crumbly consistency and stop as soon as the dough comes together. Remember, gentle hands make for happy pastries!
- Not chilling the dough: Chilling the dough is a crucial step that shouldn’t be skipped. If you don’t chill the dough, it can result in a less flaky texture. The cold butter needs time to firm up, which helps create those lovely layers. So, be patient and let your dough rest in the refrigerator for at least 30 minutes before rolling it out.
- Forgetting to seal the edges: Sealing the edges of your pop tarts is vital to prevent the filling from leaking during baking. Use a fork to press down on the edges, creating a tight seal. This not only keeps the delicious filling inside but also adds a charming decorative touch to your pop tarts.
By avoiding these common mistakes, you’ll be well on your way to mastering the art of gluten-free pop tarts. Happy baking!
FAQs About GF Pop Tarts
As you embark on your journey to create delicious GF Pop Tarts, you might have some questions. Here are answers to some of the most frequently asked questions to help you along the way:
- Can I use any type of gluten-free flour? Yes, you can use various gluten-free flours, but it’s essential to choose a blend that is specifically designed for baking. This ensures the right texture and flavor for your gluten-free pop tarts. Look for blends that include xanthan gum or other binding agents for the best results.
- Are GF Pop Tarts healthy? The healthiness of GF Pop Tarts largely depends on the filling you choose and the portion size. Opting for fruit jams with no added sugars or using healthier fillings like nut butters can make them a more nutritious option. Remember, moderation is key!
- Can I make these ahead of time? Absolutely! You can prepare the dough in advance and store it in the refrigerator for up to 2 days. Alternatively, you can freeze the unbaked pop tarts for up to 3 months. Just remember to thaw them in the fridge before baking for the best results.
With these FAQs in mind, you’re well-equipped to create your own batch of delightful GF Pop Tarts. Enjoy the process and the delicious results!

Conclusion: Final Thoughts on GF Pop Tarts
As we wrap up this delicious journey into the world of GF Pop Tarts, I hope you feel inspired to create these delightful treats in your own kitchen. There’s something truly special about making homemade pastries that not only cater to gluten-sensitive diets but also bring joy to everyone who takes a bite.
Whether you choose to fill your pop tarts with classic fruit jams, rich chocolate spreads, or even savory options, the possibilities are endless. Each batch you make can be a new adventure, allowing you to experiment with flavors and fillings that resonate with your family’s tastes.
Remember, the process of baking is just as enjoyable as the final product. Gather your loved ones, roll up your sleeves, and create lasting memories together. I would love to hear about your experiences and any unique twists you put on this recipe. Please share your creations in the comments below!
Happy baking, and may your kitchen always be filled with the sweet aroma of freshly baked gluten-free pop tarts!
PrintGF Pop Tarts: Easy Gluten-Free Recipe for Delicious Homemade Treats

A simple and delightful recipe for making gluten-free pop tarts at home.
- Prep Time: 30 minutes
- Cook Time: 25 minutes
- Total Time: 55 minutes
- Yield: 12 pop tarts 1x
- Category: Dessert
- Method: Baking
- Cuisine: American
- Diet: Gluten Free
Ingredients
- 2 cups gluten-free all-purpose flour
- 1/2 cup unsalted butter, chilled and cubed
- 1/4 cup granulated sugar
- 1/4 teaspoon salt
- 1/4 cup cold water
- 1/2 cup fruit jam or filling of choice
- 1 egg, beaten (for egg wash)
- Powdered sugar (for icing, optional)
- Milk (for icing, optional)
Instructions
- In a large bowl, mix the gluten-free flour, sugar, and salt.
- Add the chilled butter and mix until the mixture resembles coarse crumbs.
- Gradually add cold water until the dough comes together.
- Divide the dough into two balls, flatten them into disks, and wrap in plastic wrap. Refrigerate for at least 30 minutes.
- Preheat the oven to 350°F (175°C).
- Roll out one disk of dough on a floured surface to about 1/8 inch thick.
- Cut the dough into rectangles and place half of them on a baking sheet lined with parchment paper.
- Place a spoonful of jam in the center of each rectangle.
- Top with another rectangle of dough and seal the edges with a fork.
- Brush the tops with beaten egg and make a few slits for steam to escape.
- Bake for 20-25 minutes or until golden brown.
- Let cool before icing with a mixture of powdered sugar and milk, if desired.
Notes
- Ensure all ingredients are gluten-free.
- Experiment with different fillings like chocolate or nut butter.
- Store leftovers in an airtight container.
Nutrition
- Serving Size: 1 pop tart
- Calories: 200
- Sugar: 10g
- Sodium: 150mg
- Fat: 8g
- Saturated Fat: 5g
- Unsaturated Fat: 2g
- Trans Fat: 0g
- Carbohydrates: 30g
- Fiber: 1g
- Protein: 2g
- Cholesterol: 30mg